The damage that cause the problem

25 08 2010

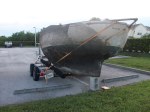
Looking at the aft end of the keel showed the fiberglass actually ‘scratched’ or ‘cut away’, probably from the motor that the guy had on it. I don’t remember what size he said he had, a 40 hp I think, but it was to big. Eventually, the thinned hull gave away, whether it was because of the rocks or the age of the damage finally giving away, it finally stopped blocking the water. So I’m thinking I should consider repairing the damage and adding a metal (stainless steel of course) guard, or cover to the area just to prevent future damage. Granted, I only have a 9.9 hp motor, but it also rubs against the keel when I try to turn the motor.

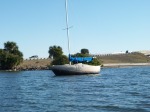
I’ll try to add some photos of the Mermaid out of the water, more to test the edit ability of the blog.

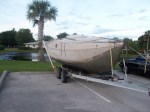
Ok, we’ll try adding them here.

As you can see, the trailer needs some work so the boat fits safely (I was driving about 15 miles an hour for the 7 miles between me and the boat ramp) so it wouldn’t take a spill. The first order of business this weekend is to get it to the car wash and get it cleaned up. More later.

Thanks for visiting.


An easier day than expected

25 08 2010

So the Mermaid finally rose again, thanks to the help from my freind David. Pumping the water out was easier than I expected and she floated with out problems, so my hopes were high. I did notice that the water seemed to rise as we motored towards the boat ramp but I tried to imagine the best. However, once we got the boat on to the trailer and pulled from the water, the damage became evident. It looks like a piece of the aft keel was ‘cut’ from the boat, probably from the motor the guy had on it rubbing against it when the motor was turned. The hull finally gave in either because of the rocks or from excessive wear. Judging from the damage, I would guess it finally gave in due to age of the fiberglass. Never the less, she’s sitting in the parking lot at the apartment looking pretty sad. First order of buisness this weekend is to clean her up some and start some of the prep work to repair the ouches.


Rough seas ahead

16 08 2010

Ok, so I’ve had her undersail a couple of times, once we had good wind and had some fun. The second time, there was no wind, but we had fun anyway. Then, a couple of weeks ago, apparently we had some stong winds that caused the Mermaid to drag her anchor. Now I have to learn about hull repair.


So here’s one photo of me happily sailing along, loving life. Then here’s the Mermaid after the wind caught her. Makes me sad.


Rudder fits

20 04 2010

Rudder has been shaped and fits the transom nicely. Now I just have to get some fiberglass on it so it doesn’t turn into an art form. Now that I have it fitting, I already see one change I need to make, that’s the tiller. Since I didn’t take into account the angle of the top of the rudder, the tiller sits at much more of an angle than I expected it to. Well, this was suppose to be a learning tool anyway. 🙂


Progress!

13 04 2010

So after an eventful friday, things are actually starting to look up! Here are some photos of what is getting done. I’ve got the rudder starting to take shape, litteraly taking shape 🙂 The end design I plan to bolt the hinge straps on, then glue the tiller on with epoxy and a couple of screws. I’ll lay some glass across the top to strengthen the extension piece and tiller as well as double glassing the bottom of the rudder incase I find shallow water.


Slow work ahead

4 04 2010

Ok, so I made this decision that I would spend all day friday working on the Mermaid with the expectation that I could get the aft stay fixed up, the brackets on the boomkin need repair along with the tension wires connected to the boomkin. Hmm, solid plan.

It took all of ten minutes to remove the stay brackets (top and bottom) I got things looking good, so off I went to the marine store about two blocks away from where I have her anchored and of course. they didn’t have anything in stock that would work, so the drive began. I spend the rest of the day shuttling between marine stores and welding shops. Oh well, lets see what happens on monday.

The first photo is of the top of the boomkin and the aft stay connection. The second is the bottom of the boomkin where the part I have to replace is still on there. The third photo is of the bottom of the mast, just because I had it, I thought I ‘d post it.

The fourth photo is of another Seaforth at anchor across the river from mine. The more I see of this classic little boat the more I like it. Can’t wait to get mine underway with wind power.


The first entry

21 03 2010

So here’s a ships log of the restoration project of the S. S. Mermaid, a 1979, 22 foot Seaforth 24. There’s lots to do to get her back to pristine shape, but it won’t happen overnight. My first priority is to get her seaworthy so I can spend a couple of weeks this summer in the keys. We’ll see how far I get with her by then.

The Mermaid at the beginning

The starting point